Stevers
Member
- Messages
- 963
- Location
- Mendip Hills
No affiliation with whoever makes Thistle One Coat - just a satisfied consumer for around 40 years.
We live in a Victorian House (1879), and right from the moment that our plumber put his foot through the landing ceiling when a jet came over low and fast (1997), I've had to occasionally patch lath and plaster ceilings. It has to be said that this has mainly been in the room with the Basement Chimney Breast. Apart from in the alcoves where I substituted plasterboard for the wormy laths that were left, I've kept the laths and used this method to do my repairs - preservation of original material and all that. On the subject of Plasterboard - gypsum wrapped in cardboard - what could possibly go wrong with that?!

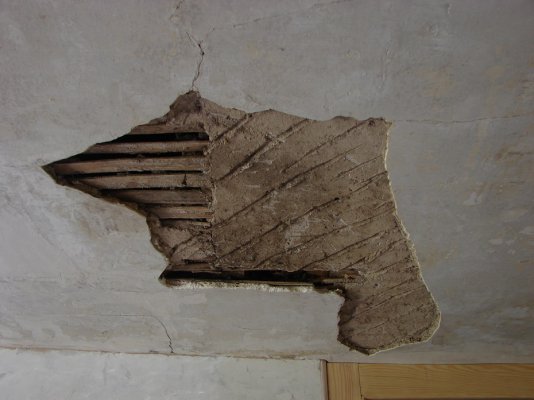
So I tackled what I firmly believe is the last bit of detached ceiling in my basement room yesterday, and after demolition it looked like an excellent example for my customary repair technique, one I've used for over twenty five years. What's particularly nice about this repair is that half of it had detached from the scratch coat, and the other half had detached from the laths. In the lath portion there were both loose laths and a missing lath. I've dealt with all these situations in this room in the past which I started decorating over twenty five years ago, but gave up on it after the cementitious tanking failed and the room was repurposed as a store and workshop for the rest of the house.
From have a smooth looking, but detached bit of ceiling, things had to get worse, much worse. In this case I used an old wood chisel to remove the detached plaster taking the loose plaster back to reasonably sound material. I used the amount of give when pressed to decide what had to go. To the right it was visibly detached by a tiny amount, but with no give to speak of I was happy to leave it. I then chamfered the edges and removed any loose material between the laths.

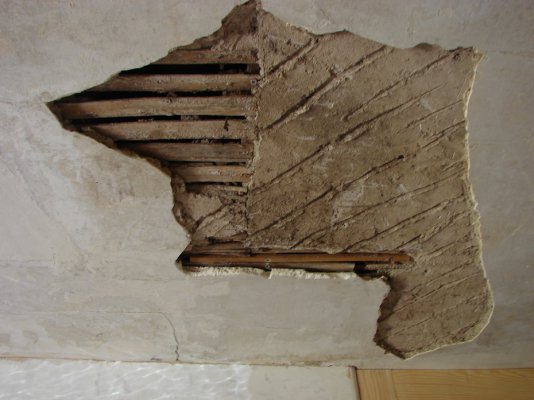
Someone has been here before with a repair leaving one of the laths a bit twisted. The first job was to secure the two loose laths with 1" stainless steel screws. The gap in the laths was filled with a strip of wood again secured with 1" stainless screws. Once this was done I put plastic down on the floor and wet the repair area with a sprayer partly to reduce dust for the next step. I then mixed up a weak PVA mix at about 3:1 and applied this to the whole area with a brush - yes, this step was messy! The Thistle One Coat was mixed in a bucket and I applied a scratch coat to the lath and plaster. I pushed the plaster well into the gaps between laths, and into the neighbouring chamfered edges.

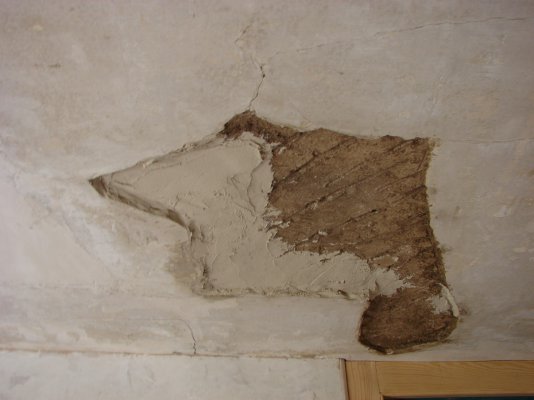
There's no need to wait for the 'scratch' coat to set - the clue's in the name of the product. A quick spray of the visible lime scratch coat and on with the float/finish coat. The key thing here is to put the right amount of plaster on, using a straight edge to judge how much is needed. Adhesion of this plaster is excellent. After about an hour the surface can be smoothed with straight edge and float, and after about another hour polished. For this sort of patching I find my old and worn pointing trowel very good at getting rid of little imperfections.

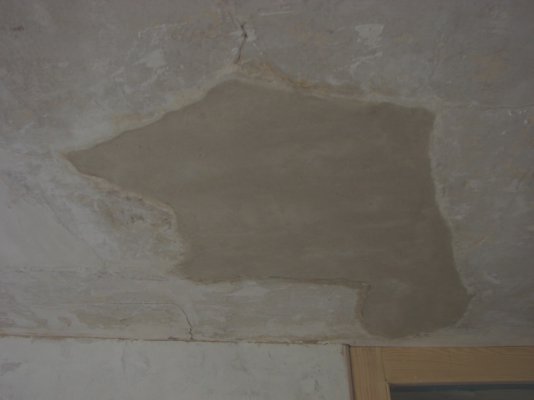
In the cold light of day from the north west facing window - sort of back to where we started. The good news is that as long as the plaster is at about the right level, any imperfections not polished out can be fixed with a quick sand and a bit of Polyfilla. There shouldn't be any concern about the use of gypsum plasters in non-historic ceilings, but I wouldn't like to try this with any sort of pink plaster. Thistle One Coat is available in sensible size bags from DIY stores, but I buy 25kg at a time and store it in fertiliser tubs, where it seems to stay fresh for years. Stale plaster will reduce working time, and in extreme cases set in the bucket. Don't ask me how I found that out!
We live in a Victorian House (1879), and right from the moment that our plumber put his foot through the landing ceiling when a jet came over low and fast (1997), I've had to occasionally patch lath and plaster ceilings. It has to be said that this has mainly been in the room with the Basement Chimney Breast. Apart from in the alcoves where I substituted plasterboard for the wormy laths that were left, I've kept the laths and used this method to do my repairs - preservation of original material and all that. On the subject of Plasterboard - gypsum wrapped in cardboard - what could possibly go wrong with that?!

So I tackled what I firmly believe is the last bit of detached ceiling in my basement room yesterday, and after demolition it looked like an excellent example for my customary repair technique, one I've used for over twenty five years. What's particularly nice about this repair is that half of it had detached from the scratch coat, and the other half had detached from the laths. In the lath portion there were both loose laths and a missing lath. I've dealt with all these situations in this room in the past which I started decorating over twenty five years ago, but gave up on it after the cementitious tanking failed and the room was repurposed as a store and workshop for the rest of the house.
From have a smooth looking, but detached bit of ceiling, things had to get worse, much worse. In this case I used an old wood chisel to remove the detached plaster taking the loose plaster back to reasonably sound material. I used the amount of give when pressed to decide what had to go. To the right it was visibly detached by a tiny amount, but with no give to speak of I was happy to leave it. I then chamfered the edges and removed any loose material between the laths.

Someone has been here before with a repair leaving one of the laths a bit twisted. The first job was to secure the two loose laths with 1" stainless steel screws. The gap in the laths was filled with a strip of wood again secured with 1" stainless screws. Once this was done I put plastic down on the floor and wet the repair area with a sprayer partly to reduce dust for the next step. I then mixed up a weak PVA mix at about 3:1 and applied this to the whole area with a brush - yes, this step was messy! The Thistle One Coat was mixed in a bucket and I applied a scratch coat to the lath and plaster. I pushed the plaster well into the gaps between laths, and into the neighbouring chamfered edges.

There's no need to wait for the 'scratch' coat to set - the clue's in the name of the product. A quick spray of the visible lime scratch coat and on with the float/finish coat. The key thing here is to put the right amount of plaster on, using a straight edge to judge how much is needed. Adhesion of this plaster is excellent. After about an hour the surface can be smoothed with straight edge and float, and after about another hour polished. For this sort of patching I find my old and worn pointing trowel very good at getting rid of little imperfections.

In the cold light of day from the north west facing window - sort of back to where we started. The good news is that as long as the plaster is at about the right level, any imperfections not polished out can be fixed with a quick sand and a bit of Polyfilla. There shouldn't be any concern about the use of gypsum plasters in non-historic ceilings, but I wouldn't like to try this with any sort of pink plaster. Thistle One Coat is available in sensible size bags from DIY stores, but I buy 25kg at a time and store it in fertiliser tubs, where it seems to stay fresh for years. Stale plaster will reduce working time, and in extreme cases set in the bucket. Don't ask me how I found that out!
