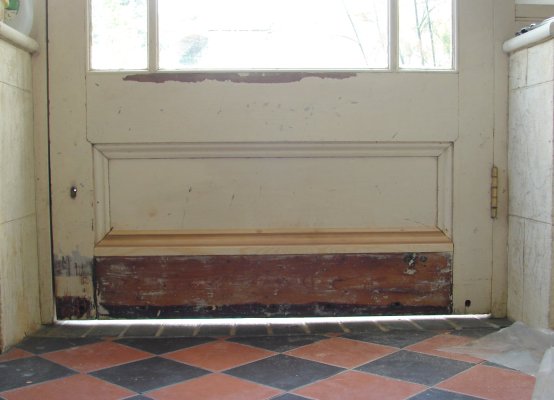
Stevers
Member
- Messages
- 971
- Location
- Mendip Hills
The porch that I built in 2003 is due another coat of paint and the main problem area appeared to be the door. This door was a very strange size, being the best part of 3' by 6'10". Being an odd size, smothered in white gloss and with obscure glazing it had been languishing in Frome Reclamation for some time. Given that I could build my porch round any size door I liked, a cheeky offer was made and very grudgingly accepted. Even better, as bought, it had additional wood down each side to widen it even further and I would be the first person to hang this door at its original width - what could go wrong?
The door was stripped (hot air gun) and reglazed in 6mm clear laminated glass. At the time I was advised to use glazing silicon for the primed internal bed, but could then put a traditional putty bed outside for the porch windows. Doors are treated differently to windows and I followed the accepted wisdom(?) of having the rebate on the inside and used glazing silicon and a narrow wooden bead for which there was barely enough room.
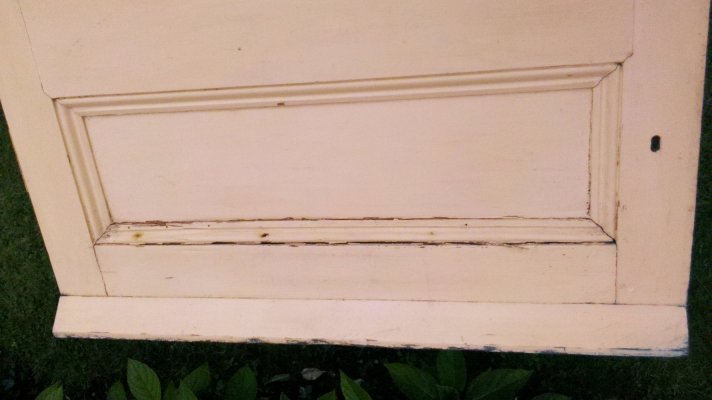
So what was the problem? Well there was gap along the top of that bottom Ogee bead that had always refused to stay closed even when pinned. This photo was taken immediately after I'd carefully removed it to reveal that under my three paintings (seven layers?) it was absolutely soaking wet even during a dry spell. There's barely a hint of it in this picture but the wet Shredded Wheat ran along the top of the bottom rail and down each side of it - mostly on the right hand side that was in very poor shape. With great difficulty the weather bar was removed (very rusty BZP Pozidrive screws from the back - another mistake) to get a closer look.
Initially I carefully cut off the soft top 16mm or so off the bottom rail, and fashioned a piec of 2.5" ogee architrave to match what was there, but then I twigged that this door although full exterior door thickness had never been outside, there being no sign of a lock or weathering and it had even been varnished both sides in a previous life. The ogee bead trim is typical of internal doors and quite unlike the bolection cover mouldings that are on my front door. Despite this being a north east facing door this it seems was an accident waiting to happen. Now of course the odd size of this door came back to bite me, as to replace it, the opening would need to be reduced for a 6'8 x 2'8" door - if I could even source one that was suitable.
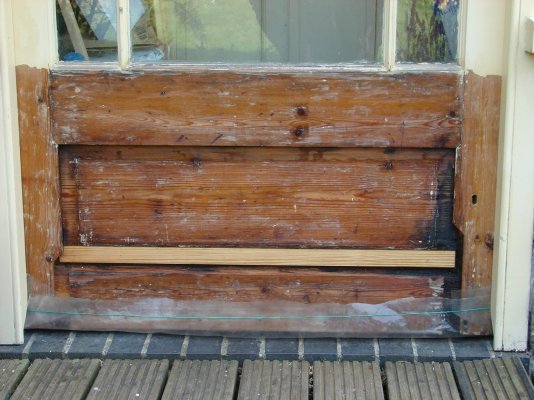
Repair it was then... A cunning plan was hatched to change the door to a more appropriate detail for an external door. I realised that my cheap router set had an ogee bit that could put a moulding on some repair pieces that could potentially make the door more weatherproof with a moulding that closely matched the glazing bars. The paint was stripped from the base of the door and the top of the horizontal glazing bars. The worst of the wet Shredded Wheat around the bottom rail joints was also removed ready for the repair pieces to go in. This included the base of the panel (unprotected by paint behind the beading). It was in a sorry state and was trimmed off straight with a Stanley knife. A nice looking (resinous) repair piece of exactly the right thickness was then epoxied back in.
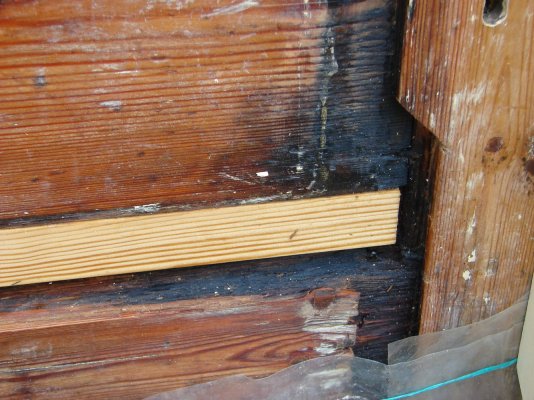
The poor state of this side of the door showing that the damage was up the right style indicating to me that water was also tracking in from further up. That meant the glazing beds were suspect and there had indeed been tell tale paint loss internally behind one of them. So this will be addressed in a later instalment.
Next the bottom of the door and horizontal glazing beads were soaked in what Barrattine market as their clear wood preservative 'primer'. Once the door was back on I fitted the polythene nappy seen above and applied copious quantities of the oily Barrattine exterior clear preservative in at least two coats. The repair pieces cut from a length of architrave (about the only one in the rack that was the full 5/8" that I needed) got the same treatment. Most of the finished wood in the rack was slow grown, though disconcertingly pale to be a redwood, but it would have to do.
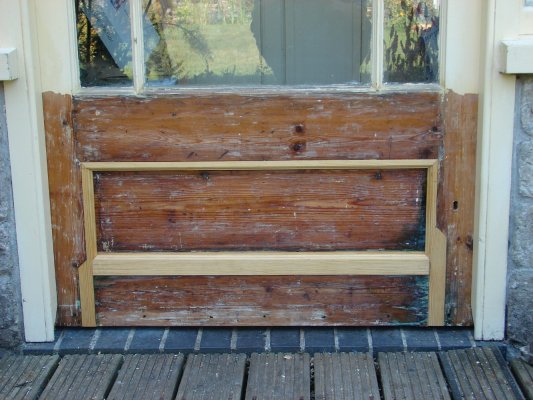
Once that was dry I treated all the softened wood with the CCC two part epoxy wood hardener - the blue one. That needed two soakings to get good penetration on all of it. The swollen bottom rail was clamped straight whilst that set up straight, and then the voids behind filled with what was left of my CCC two part epoxy resin filler. That allowed me to do the final dry fit of the repair pieces as seen above. As a sidenote the middle rail has what I am given to understand are 'gunstock joints', my repair pieces have slightly extended them and have also raised the top of the bottom rail to take it further away from the splash zone.
Now I'm awaiting a fresh supply of CCC epoxy filler to put it all back together, and that begs the question - where should all that epoxy go if the panel is going to be able to respond to changes in humidity and not split after being glued solid? Is there anything else that I should use to seal the gaps round the panel or should I trust to the oily preservative and allow the paint to crack to let it 'breath'. This time I'm not going to paint the bottom of the door, as this might allow water out, as it will be protected by the oily preservative, and the repaired weather bar that I'll refit with stainless screws. I'm well into overthinking this now - what fun!
The door was stripped (hot air gun) and reglazed in 6mm clear laminated glass. At the time I was advised to use glazing silicon for the primed internal bed, but could then put a traditional putty bed outside for the porch windows. Doors are treated differently to windows and I followed the accepted wisdom(?) of having the rebate on the inside and used glazing silicon and a narrow wooden bead for which there was barely enough room.

So what was the problem? Well there was gap along the top of that bottom Ogee bead that had always refused to stay closed even when pinned. This photo was taken immediately after I'd carefully removed it to reveal that under my three paintings (seven layers?) it was absolutely soaking wet even during a dry spell. There's barely a hint of it in this picture but the wet Shredded Wheat ran along the top of the bottom rail and down each side of it - mostly on the right hand side that was in very poor shape. With great difficulty the weather bar was removed (very rusty BZP Pozidrive screws from the back - another mistake) to get a closer look.
Initially I carefully cut off the soft top 16mm or so off the bottom rail, and fashioned a piec of 2.5" ogee architrave to match what was there, but then I twigged that this door although full exterior door thickness had never been outside, there being no sign of a lock or weathering and it had even been varnished both sides in a previous life. The ogee bead trim is typical of internal doors and quite unlike the bolection cover mouldings that are on my front door. Despite this being a north east facing door this it seems was an accident waiting to happen. Now of course the odd size of this door came back to bite me, as to replace it, the opening would need to be reduced for a 6'8 x 2'8" door - if I could even source one that was suitable.

Repair it was then... A cunning plan was hatched to change the door to a more appropriate detail for an external door. I realised that my cheap router set had an ogee bit that could put a moulding on some repair pieces that could potentially make the door more weatherproof with a moulding that closely matched the glazing bars. The paint was stripped from the base of the door and the top of the horizontal glazing bars. The worst of the wet Shredded Wheat around the bottom rail joints was also removed ready for the repair pieces to go in. This included the base of the panel (unprotected by paint behind the beading). It was in a sorry state and was trimmed off straight with a Stanley knife. A nice looking (resinous) repair piece of exactly the right thickness was then epoxied back in.

The poor state of this side of the door showing that the damage was up the right style indicating to me that water was also tracking in from further up. That meant the glazing beds were suspect and there had indeed been tell tale paint loss internally behind one of them. So this will be addressed in a later instalment.
Next the bottom of the door and horizontal glazing beads were soaked in what Barrattine market as their clear wood preservative 'primer'. Once the door was back on I fitted the polythene nappy seen above and applied copious quantities of the oily Barrattine exterior clear preservative in at least two coats. The repair pieces cut from a length of architrave (about the only one in the rack that was the full 5/8" that I needed) got the same treatment. Most of the finished wood in the rack was slow grown, though disconcertingly pale to be a redwood, but it would have to do.

Once that was dry I treated all the softened wood with the CCC two part epoxy wood hardener - the blue one. That needed two soakings to get good penetration on all of it. The swollen bottom rail was clamped straight whilst that set up straight, and then the voids behind filled with what was left of my CCC two part epoxy resin filler. That allowed me to do the final dry fit of the repair pieces as seen above. As a sidenote the middle rail has what I am given to understand are 'gunstock joints', my repair pieces have slightly extended them and have also raised the top of the bottom rail to take it further away from the splash zone.
Now I'm awaiting a fresh supply of CCC epoxy filler to put it all back together, and that begs the question - where should all that epoxy go if the panel is going to be able to respond to changes in humidity and not split after being glued solid? Is there anything else that I should use to seal the gaps round the panel or should I trust to the oily preservative and allow the paint to crack to let it 'breath'. This time I'm not going to paint the bottom of the door, as this might allow water out, as it will be protected by the oily preservative, and the repaired weather bar that I'll refit with stainless screws. I'm well into overthinking this now - what fun!

