Historic Housesitter
Both seeker and imparter
- Messages
- 19
- Location
- Kent
Some light reading to understand what is going on with the bricks and lime... https://buildbright.co.uk/lime-mortar/lime-vs-cement-mortar
Yup, render is the external 'plastering' of a wall. Styles are all different, but it's especially common in areas exposed to adverse weather conditions.
Don't have plastering done yet. Certainly not gypsum or NHL 3.5 .
If the supporting beam (with correct wood cladding and engineeering brick pads!!!) does it's job properly and nothing else opens up in the meantime, there is no need for the helibar / pinning as things wouldn't move any more than usual thermal expansion.
You ask 'Could crumbly mortar cause cracks in the bricks?' No it doesn't, but the cementeous material surrounding it does. As stated previously by myself and others, lime putty is soft by design to allow bricks to drain of water / moisture into the lime without damage.
They work reciprocally. Lime is able to withstand frost and heat and takes the hit, self-repairing in damper weather, so that the bricks don't 'blow' (loose their 'face') or crack when the frost and ice gets into any natural cracks and fissures in their design, every winter. Where your walls have been clad in current plaster and render, this hasn't been allowed and the plaster / render simply saps everything from both lime and brick, weakening both. This is where dampening and repointing with lime putty is essential to maintain the integrity of the walls.
Back to the builder - If they feel they must use helibars, then ensure minimal use of the resin, rather than any cement / grout. TBH it is super easy to use yourself, although you need a specific 'skeleton gun' to us the below resin:
We used RKEM II bonded anchor, as our de-rendered, blown-and-carved-up-bricks Victorian house (think Wolverine and Freddy Kreuger with an angle grinder) , needed help accepting the bolts needed for our new roof's ledger board. I would certainly use this over cement / grout as while it sticks like the proverbial, it won't sap the moisture from the bricks and lime surrounding it, like cement bond would.
In honesty and sadly experience, I suspect the will try to talk you down, but you need to be firm. To me, so far, it doesn't look like they know what they're doing - and so far it's looking very dicey IMHO. I recognise they are already doing things on the cheap, judging by the style of the 'RSJ' and its plinth of treated timber, rather than all blocks or engineering bricks.
TBH, don't be scared to request the builder redo the support structure for the beam and then *sack him* and find a new one (even ask the SE if they know a good one from another job they've looked at), they are ten-a-penny these days and while you may need to wait for a good one, they are out there (I think).
In the meantime you would then have time to call upon companies that will know what you need, even if you do it in sections:
RSJ / Steel beam manufacturers will fabricate and install it themselves (they too may know a good builder).
A different builder or handyman to install the window lintel.
Lime plasterer - or go on a course, it's fun stuff to work with and you're missing out!
As for cladding outside, depending on your budget, have this removed next year and repoint the bricks with lime putty. It isn't an urgent issue at this point and all cement render cracks over time, so, so long as the pointing is fairly sound, concentrate on what is going on with the other main issues you are currently dealing with.
Lime plasterer - DEFINITELY use lime putty for the repointing and plastering as directed, which will allow the walls to do their usual thing in response to movement with thermal expansion. If you don't, your walls will simply crack again with the natural movement.

The lines are from prep for the stitching. But they stopped when they saw upstairs and wanted the SE to take another look.The beam would better clad in oak or a similar hardwood and does need tying to the party wall via angled Samson Ties and bolts - resin is safest, to prevent blowing bricks with expansion plugs etc.
Yes the main issue is what the beam sits on.
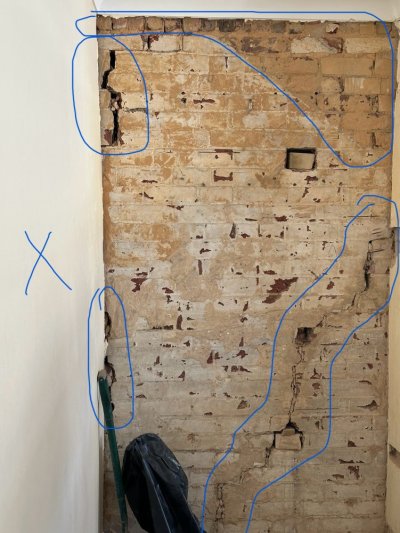
What are the lines of missing pointing from?
Just out of interest, is there a fireplace next to the alcove? The thinner crack on the right hand side will just be settlement of the fireplace and any work that was done around it. Consider also (looking at the paint shadow on the exposed brick of the wall), that the stairs may have been movedfrom there at some point.
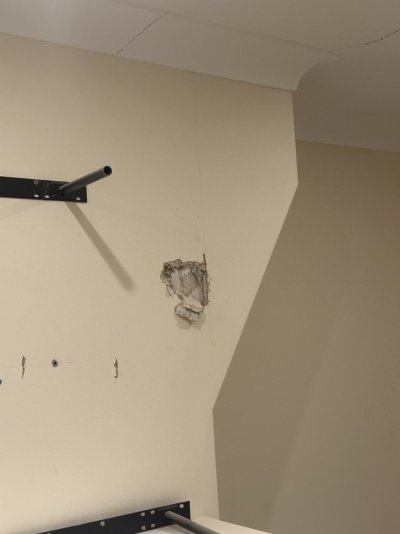
The crack in the bedroom looks similar. TBH we have that in our terrace as well, in both rooms we've exposed brick in - along with all the other old properties I've worked in. Again just settlement of the building.
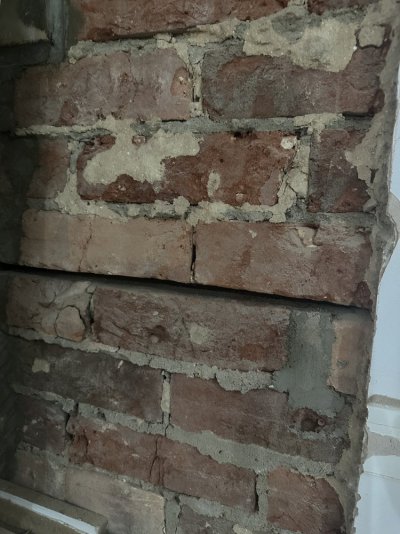
The grey pointing is rock hard because it would have been a quick pointing job before plastering with... cement bond. The lime will feel soapy to the touch (the whitish stuff - wash your hands properly afterwards, as lime residue will burn your skin), as opposed to the grey cement which feels crisp and difficult ney impossible to crush between your fingers.
This needs raking out properly before lime putty pointing.

I think so, and i believe that’s how it was intentioned. Maybe just incredulous (like me) that a crack in the party wall can turn into that in an instant. We went from thinking we were getting our issues resolved, to that.Did I detect a hint of sarcasm or playfulness earlier in this thread about the house being about to be demolished ( echoing the words of the over-zealous builder). Sometimes I find it confusing when people are having a joke that not everyone (including myself) understands. It can cause unnecessary anxiety and even mistakes being made in real life because people didn't realise what was echoed was in jest, or a sarcastic comment as being just that and not the truth.
I know I would be paralysed with worry if a builder had said my house needed to be demolished. Not a laughing matter to me.
Do you mean the light patch on the RHS of your photo as I look at it?The lines are from prep for the stitching. But they stopped when they saw upstairs and wanted the SE to take another look.
There is a chimney beside that alcove yes. It was checked over and deemed fine, they went on the roof to do that check.
This is the party wall on a semi detached. I don’t think the stairs were there but they also think something was cut out. Here’s a pic of the opposite side. The lighter area is the part that sticks out. Perhaps not the best angle.
Assuming (dangerous i know) that the plaster used on the beam is less of a concern?
View attachment 18315
Sorry probably me confusing things. The light part that sticks out, they think there may have been something similar on the other LHS that’s been exposed. The patches / brickwork look different in that corner of the wall.Do you mean the light patch on the RHS of your photo as I look at it?
They may have had an old stud wall there, or perhaps there were two fireplaces downstairs and they joined up to one chimney.
Plaster on the new beam do you mean? Building regs require two layers of fireproof plasterboard (pink), encapsulating said beam before any plastering. This is fine to use modern gypsum on, although bear in mind this and lime plaster next to eachother will always crack, so a small fissure between ceiling, wall and beam will always present itself, as all three surfaces expand and contract at different levels.
It could also be a lot worse. Believe me when I say there will be someone out there with the right knowledge that will help. In fact, aside from the window lintel(s?) needing replacement, you are part way there already and just need a lime expert to repair the damaged mortar bed, pointing and plastering, including the render outside. If it's a big enough job, the right people will travel for it as they know there aren't that many specialists around and will be eager to look after the building's heritage, rather than an average builder needing money to fund their own life.I think so, and i believe that’s how it was intentioned. Maybe just incredulous (like me) that a crack in the party wall can turn into that in an instant. We went from thinking we were getting our issues resolved, to that.
Maybe it still is an eventual outcome, but everyone we’ve spoken to, inc on here and in private has reacted pretty much the same way that there must be an alternative solution.
But i’m glad i found this site, everyone been super helpful with things to consider and has lead me to the conclusion we can’t press on regardless of tomorrow meeting with the SE and we need to stop and get others to take a look.
And i’ve also got an idea of the skills that person might need thanks to those here taking the time to reply to me. Super appreciative.
Still worried sick of course and it isn’t nice. But at least i feel like i have a little control over what i need to do.
Oops my bad, my second sentence was in reference to the downstairs wall !Sorry probably me confusing things. The light part that sticks out, they think there may have been something similar on the other LHS that’s been exposed. The patches / brickwork look different in that corner of the wall.
And yes i meant the beam. Understood what the difference will mean.
Thanks. I’ve read this a few times. I’ve failed to try and summarise everything as well as this. Which i’m normally good at in my job. Different when it’s out of work and your house i guess eh!If I have properly understood all the information you have supplied and the feedback you've received thus far then the underlying and root causes for all the critical damage are:-
I understand from your earlier comments that a new beam and lintels have now been installed. Provided these are of a suitable calibre and properly installed the fundamental weaknesses of the house should now have been addressed and the remaining works should only include consolidation and perhaps reinforcement (stitching) of the brickwork and all repairs to the plasterwork and cosmetic elements.
- The removal of the internal solid wall to enlarge the ground floor area and a failure to install a suitable lintel/beam/steel to support the floor above AND to properly tie the outer wall with the wider masonry structure of the house.
- That original wall may also have directly carried the weight of a wall/walls on the upper floor used to create particular rooms and to ultimately carry some elements of the roof structure.
- Replacement of window frames on the ground floor without installing suitable lintels will have also weakened the structural integrity of the outer wall.
- Heavy snow loads on the roof could then result in rafter spread to exert outward pressure on the wall and producing stresses in the main masonry structure to in turn induce the cracks in the party wall.
- Its worth noting that such stress/tension damage results from transient and repeated occurrences of such loads rather than a 'one time' incident,
- Also, that such repeated events can also produce a grinding effect inside cracks in the mortar to further weaken the structure and to in effect pulverise the mortar itself.
Generally right now I think you are moving into a good position and the longer term threats are coming under control. Nevertheless I would be keeping a close eye on that builder, he seems a trifle nervy to me.
Hmm, hard to see what scared them in that small opening really... I can make out plasterboard over two sets of plaster?
View attachment 18318
This is from the protuding section containing the chimney brest taken upstairs
I’m intrigued by this comment - how does a cement render or a gypsum plaster suck moisture out of a wall? Particularly when so many on here have to hack such coverings off to allow their walls to dry out…ooking at these photos, on closer inspection and with the added knowledge that you have this render, it doesn't surprise me in the slightest you have these cracks in the plaster. The moisture has been sucked out of the wall from both sides (cement render and plaster), so this has caused the crumbly mortar bed.
Two layers of fireproof pink plasterboard is probably overkill for the worst case 60 mins protection required for most homes which can be achieved by a single layer of 15mm pink plasterboard or two staggered layers of standard plasterboard. 60 minute intumescent paints are also available if you wanted to leave the timber exposedPlaster on the new beam do you mean? Building regs require two layers of fireproof plasterboard (pink), encapsulating said beam before any plastering. This is fine to use modern gypsum on
Apologies, not for the first time today i know but not following. Not much has been said about this bit. This was exposed as part of the chimney checks. The latest concern that stopped play today is the section to the left of this once the entire wall had been uncovered. Something in this bit, posted earlier and think you have already reviewed and commented on!Hmm, hard to see what scared them in that small opening really... I can make out plasterboard over two sets of plaster?

Pass, no idea what i’d be looking even if there was. Sorry.If there is a wrought iron or steel support lintel under the arch of those bricks, it looks fine to me.
Please do retain that beauty. Plasterboard cover-up jobs are a modern blight on older buildings. (I hope there was an airvent in the board?
